Unlock the Magic of Colors in Obvara Firing!
Discover how to creatively experiment with colors using Obvara firing techniques. This guide will help you unleash your artistic potential through simple steps that will significantly enhance your ceramic creations! Dive in to learn how to make your clay come alive with vibrant hues!
Gather Your Tools and Materials
To successfully experiment with colors in Obvara firing, gather the following essentials:
Now you’re ready to begin!


Mastering the Art of Obvara Firing: A Unique Ceramic Technique
Step 1: Prepare Your Clay Creations
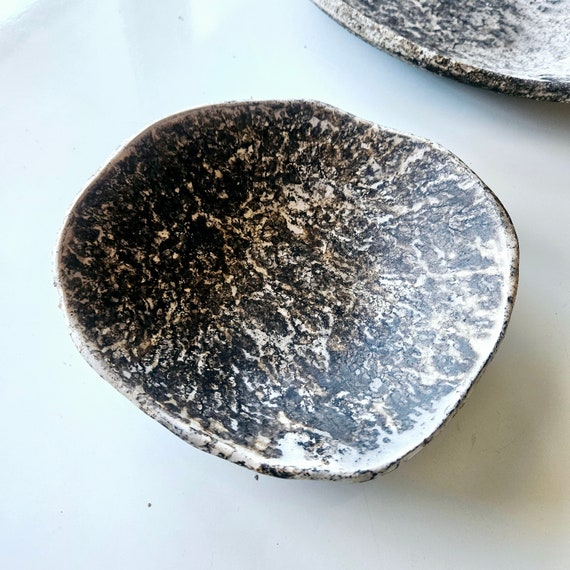
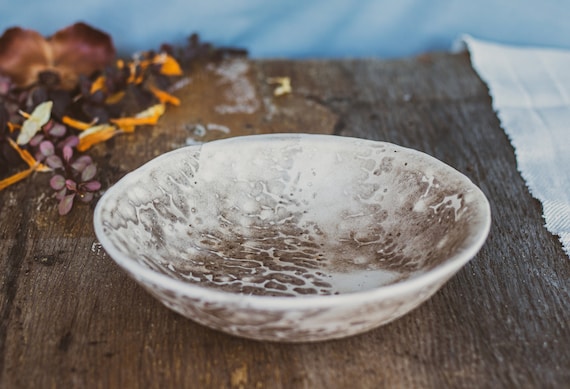
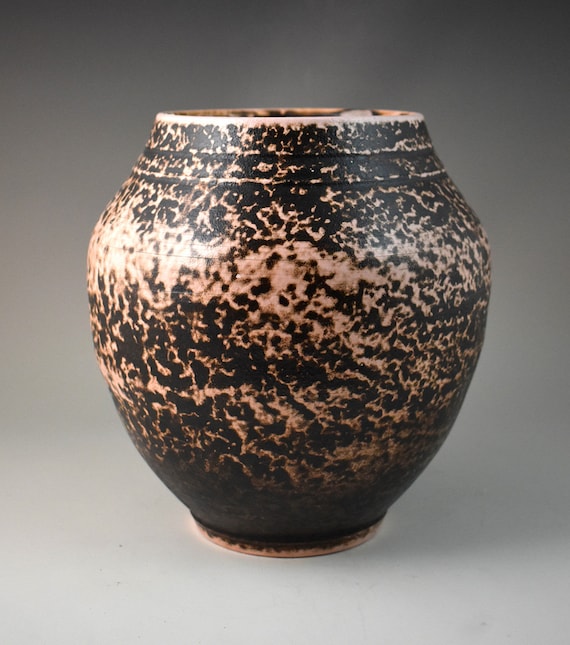
Transform Your Ideas into Beautiful Forms!Shape your clay pieces with intention! Begin by forming various designs that catch your eye. Consider how different shapes—round bowls, sculptural vases, or textured plates—will interact with the Obvara treatment. Each design offers unique possibilities for color application.
Think about texture. The surface finish can dramatically influence how colors appear after firing. A smooth surface will reflect light differently than a textured one, enhancing or muting colors.
Experiment boldly! Don’t be afraid to try unconventional forms. For example, create a spiraled piece or an asymmetrical dish. These shapes may reveal unexpected color effects during the firing process, giving your work a distinctive style.
Test small pieces first. Before committing to a larger project, craft smaller trials to see how your shapes react with Obvara. This will not only hone your skills but also refine your understanding of the final color results.
Embrace this initial phase as an opportunity to explore and set the foundation for your colorful creations!
Step 2: Develop Your Obvara Recipe
Crafting the Perfect Mixture for Vibrant Colors!Craft your Obvara solution with precision! Start by combining traditional ingredients: equal parts flour and water, plus a splash of yeast for fermentation. Adjust the ratios to manipulate color depth and finish. For example, increasing the flour concentration can enrich the caramel tones in your finished pieces.
Experiment with additives! Incorporate natural ingredients like sugar, vinegar, or even coffee grounds. Each addition can subtly alter the final hue. A spoonful of coffee can yield rich browns, while vinegar can sharpen the contrasts in lighter hues.
Mix thoroughly! Blend your ingredients until you achieve a homogenous mixture. This ensures that color distribution will be consistent across your pottery.
Test variations! Make small batches and adjust one ingredient at a time. This allows you to see how each change impacts your results. For example, modify the yeast amount to create a more bubbly texture that can trap color differently.
Document each recipe! Keep notes on your experiments, including ingredient ratios and the resulting colors. This will be invaluable for future projects, helping you recreate or refine your favorite looks consistently.
Step 3: Experiment with Color Application Techniques
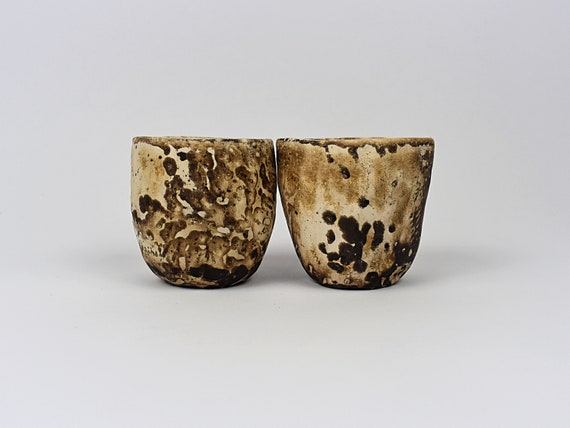
Discover the Art of Color Placement!Apply your Obvara mixture using various techniques! Delve into the world of color by choosing from methods like dipping, brushing, or spraying. Each technique presents unique textures and saturation levels, providing you with diverse artistic outcomes.
Dipping is the simplest approach; immerse your piece in the Obvara solution. This method produces uniform color coverage and can create rich, deep hues. For instance, try dipping a bowl halfway for a gradient effect, where the top remains lighter than the bottom.
Brushing allows for detail and precision. Use a soft brush to apply the Obvara; this technique is perfect for adding colors in specific areas or highlighting textures. To achieve dynamic contrasts, layer the Obvara on raised sections of your pottery, letting bright colors pop against a darker base.
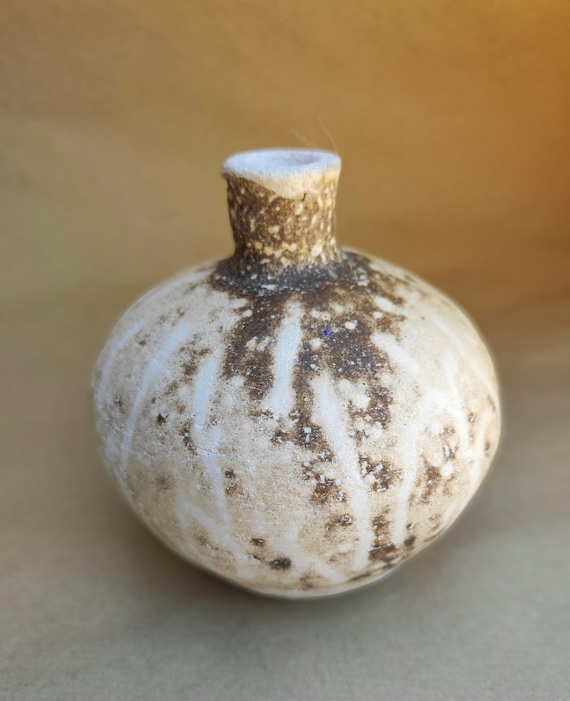
Spraying is a more adventurous method. Utilize a spray bottle filled with the Obvara mixture to achieve a soft, mist-like application. This technique creates ethereal washes of color that can blend beautifully into one another. For example, imagine a vase that transitions from a deep black at the base to a warm brown at the top.
Explore each method! Don’t hesitate to mix and match—try dipping first, then brushing over it. Your artistic journey is about discovery, so embrace the unexpected!
Step 4: Fire with Confidence
Heat Up Your Creativity and Watch the Colors Emerge!Fire your pieces in the kiln! Place your clay creations in the firing chamber, ensuring they are arranged securely and with enough space for heat circulation. As the temperature rises, observe how the colors react to the heat. This is the phase where magic happens, turning your designs into vibrant, eye-catching works of art!
Monitor the process closely. Pay attention to how different colors shift when subjected to high temperatures. For instance, a deep blue may transform into a lighter shade while a rich brown evolves into caramel.
Experiment with firing duration and atmosphere. Adjusting the time and temperature can also influence the final appearance. A shorter firing may result in more muted colors, while prolonged exposure can enhance saturation.
Keep a firing record. Document the temperature settings and duration for each piece, noting how these factors affect color outcomes. For example, if a particular piece turns out stunning but unique, boulder that process for future projects.
Finally, embrace anticipation! As you open the kiln door after firing, prepare for surprises and delightful discoveries in your artwork. Trust in your experiments and the beauty they will bring.
Step 5: Analyze and Reflect on Your Results
Learn from Your Colorful Experiments!Evaluate your outcomes! After your pieces have cooled, take time to closely inspect what you’ve created. Check for both color vibrancy and texture. Did your alterations yield the desired effects? For instance, if you aimed for a rich, brown hue and ended up with an unexpected tan, take note!
Document your findings in a dedicated notebook or digital file. Write down what worked well and what didn’t, including specifics like ingredient ratios and application methods. This will not only sharpen your skills but also serve as a valuable reference for future projects.
Consider making comparisons. Line up pieces that used different techniques or color applications side by side. Discuss with fellow artists or share in community forums to gain fresh perspectives. Engaging with others can spark new ideas or improvements for your next round of experiments.
Reflect on the process. Spend a moment thinking about each step you took. What did you enjoy the most? Which colors inspired you? This reflective practice enhances your creative journey and sets the stage for more innovative explorations ahead!
Embrace the Journey of Colorful Discovery!
Now that you’ve learned how to experiment with colors in Obvara firing, let your creativity flourish. Each experiment is a new opportunity to create vibrant art! What unique colors and techniques will you explore next to further transform your artistic vision?


This guide is super helpful! I’ve been struggling with my clay prep but you made it sound so simple. One question though—any tips for beginners on developing the Obvara recipe? I’m really nervous about messing it up!
Great question, Megan! Start with a basic recipe and then tweak one ingredient at a time to see how it changes the outcome. It’s all about experimentation!
I was nervous too, but just remember, it’s all part of the fun! The more you try, the better you’ll get.
Great tips! The firing process sounds intimidating though. Any advice on staying calm and not freaking out? 😂
Haha, I feel you! Just keep reminding yourself it’s all part of the learning curve.
Just remember, it’s all about the process, Jake! Take deep breaths and enjoy the moment. You got this!
This is just what I needed! I’ve been stuck in a rut with my pottery. Can’t wait to try this out! Do you really think the colors will pop even on dark clay?
Dark clay can actually create a beautiful contrast with vibrant colors! You’ll be surprised!
Yes, indeed! Just make sure to apply a good layer of your Obvara mix and you should see some nice results.
Love this article! I was wondering if anyone has tried mixing colors directly into the Obvara before applying? I’m curious about the outcome!
I haven’t tried that yet, but sounds like a fun experiment! Let us know how it goes!
Yes, mixing colors into the Obvara can create some really unique effects! Just test it on a small piece first.
This looks fun! I’m particularly interested in the analysis part. How can I effectively analyze my results after firing?
Great question, Liam! Take notes on the colors and textures, and compare them with your expectations. It helps for future projects.
Definitely recommend taking photos too! It makes it easier to track your progress and find what works.
Lol, I love how you call it ‘colorful discovery.’ Sounds like a fancy way to say ‘trial and error’ 😂 Can’t wait to see what mess-ups I create!
Exactly! Some of my best pieces have come from ‘oops’ moments.
Haha, trial and error is definitely part of the journey! Just embrace the chaos, Tommy!
Wow, I never thought I’d be so excited about firing pottery! The way you broke down the color application techniques is golden! 🌈 I can’t wait to try out my own Obvara mix. Also, could you explain more about how different temperatures affect color?
Totally agree, Sarah! I’ve been experimenting with glazes, but this technique seems much more forgiving.
Thanks for the kind words, Sarah! Different firing temperatures can really change how colors appear. Lower temps can give you more muted tones, while higher temps can bring out vibrancy.
I’m so pumped to try this! Your enthusiasm is contagious! 🌟 Just a heads up though, I tend to be a perfectionist. Any advice on letting go a bit?
Exactly! Some of my favorite pieces are the ones that didn’t go as planned.
Embrace the imperfections! They often lead to the most interesting results. Art is about expression, not perfection.
I’m new to pottery and honestly, a bit overwhelmed by all the techniques. Do you think I should start with one color before diving into more complex mixes?
Yes! Master one color first, then you can get fancy with mixes later!
Definitely! Starting simple will help you build confidence and understand how colors interact.