Understanding Saggar Firing: An Introduction
Have you ever wondered how unique textures and colors emerge in ceramics? Saggar firing is a fascinating technique that offers potters an opportunity to create truly one-of-a-kind pieces. Unlike traditional firing methods that rely solely on heat, saggar firing involves enclosing pottery in a protective container, or saggar, during the firing process.
This method not only allows for experimentation with various materials but also results in stunning visual effects that reflect the interplay between smoke, ash, and the clay itself. Throughout this article, we’ll delve into the nuances of saggar firing, revealing its significance in the ceramics world and how it contrasts with more conventional techniques.
From understanding the essential materials to mastering the firing process, each section will provide you with the knowledge needed to explore and embrace saggar firing in your pottery practice. Let’s embark on this creative journey together!
Mastering Saggar Firing Techniques with Anthony Rollins
What is Saggar Firing?
Saggar firing is a distinctive pottery technique that revolves around using a protective container known as a saggar during the firing process. The core purpose of the saggar is to shield the pottery from direct flame and the harsh conditions of the kiln environment, which can sometimes lead to undesirable effects such as soot or burns on the surface. This method not only safeguards the piece but also allows for incredible creativity, allowing potters to explore myriad materials that can influence the finished work.
Historical Context
The origins of saggar firing can be traced back to ancient pottery techniques, where artisans used saggars to enhance the visual appeal of their ceramic wares by incorporating organic materials. Over time, potters realized that placing pottery within saggars could produce unique aesthetic outcomes. Historically, this method has been prevalent in various cultures, from the smoke-fired pottery of indigenous peoples to the more refined processes utilized in contemporary studios.
The Role of the Saggar
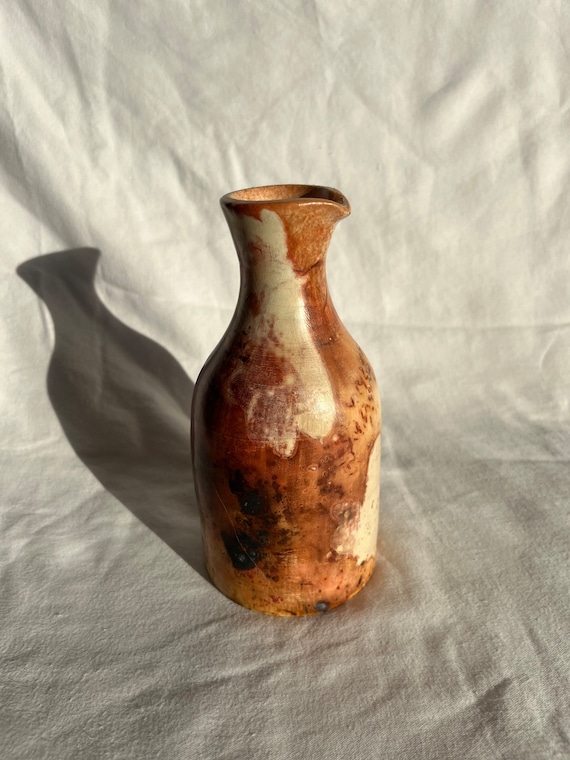
Saggars come in various shapes and sizes, typically constructed from materials that can withstand high temperatures—such as clay, metal, or even stoneware. Each saggar can be adapted to alter the atmosphere surrounding the pottery during firing. Inside, potters often include items like sawdust, copper carbonate, or salts, which combust and release vapors that interact with the pottery’s surface. This generates vivid colors and textures that are virtually impossible to replicate with traditional firing.
The Aesthetic Purpose
The aesthetics achieved through saggar firing can vary dramatically, largely influenced by:
For instance, a piece encased in a saggar filled with pine needles may result in a piece with rich, earthy hues, highlighting the nuances of nature. Such creativity and experimentation epitomize the allure of saggar firing.
As we delve deeper into the realm of saggar firing, it becomes essential to understand the materials and tools required to embark on this artistic journey. Knowing what you’ll need is crucial for maximizing your creative potential and achieving those stunning results that make saggar firing a beloved technique in the ceramic community.
The Materials and Tools Required for Saggar Firing
Embarking on the journey of saggar firing requires more than just creativity; you’ll need a curated selection of materials and tools. Understanding the purpose of each component is vital for achieving the desired aesthetic outcomes. Here’s a closer look at what you’ll need to get started.
Types of Saggars
The saggar itself is the star of saggar firing, and its design and material can significantly influence your results:
Each saggar type comes with its unique set of possibilities, enhancing the artistic flair of your pottery.
Kiln Types
Choosing the right kiln is essential in saggar firing. Here are common options:
Investing in a quality kiln suited to your saggar firing method is key to successful outcomes.
Firing Materials
Next, let’s talk about the materials you’ll place inside your saggar. The selections here can create stunning effects:
It’s like crafting a secret recipe—each ingredient influences the final dish.
Essential Tools
Beyond materials, having the right tools is essential for an efficient saggar firing process:
Each tool contributes to the overall process, ensuring your pieces are not only beautiful but also crafted with care.
With a solid understanding of the materials and tools essential for saggar firing, you’re well on your way to creating stunning, one-of-a-kind ceramic pieces. Next up, we’ll look at how to prepare your pottery to maximize the potential of this captivating firing technique.
Preparing Your Pottery for Saggar Firing
Once you have gathered your materials and tools, it’s time to prepare your pottery for saggar firing. This process is critical in ensuring your artworks emerge from the kiln with the desired effects and beauty. Here’s how to get started:
Drying Your Pottery
Before firing, the first step is to ensure your pottery is thoroughly dried. Here’s how to do it effectively:
Skipping the drying stage may lead to disastrous results; a rapid temperature change can cause your pottery to crack during the firing process.
Applying Glazes
After ensuring your pottery is dried and ready, you can begin applying glazes. Here are essential tips to consider:
Remember, certain glazes react uniquely in a saggar environment. They may develop interesting effects due to the materials and atmosphere.
Choosing the Right Saggar
Deciding on the appropriate saggar is crucial to the success of your firing process. Here’s a quick guide to making the right choice:
A well-chosen saggar will enable the materials within to work their magic, enhancing the final appearance of your pieces.
Common Mistakes to Avoid
In the excitement of preparing for saggar firing, potters can make a few common errors. Here’s how to sidestep these pitfalls:
By keeping these guidelines in mind, you can lay a strong foundation for a successful saggar firing experience.
With your pottery properly prepared, you’re now ready to delve into the firing process itself. Let’s explore this captivating journey step-by-step to create breathtaking ceramic artwork.
The Firing Process: Step-by-Step Guide
The firing process is often where the magic of saggar firing truly happens, transforming your meticulously prepared pottery into stunning works of art. This section walks you through the essential steps of loading the kiln to monitoring temperatures during the firing—designed to make the experience accessible, whether you’re a novice just beginning your journey or a seasoned ceramist refining your craft.
Step 1: Loading the Kiln
Careful loading is crucial for a successful firing. Here’s how to do it effectively:
- Prepare the Kiln: Ensure the kiln is clean and free of debris. This prevents unwanted contamination that could affect the outcome.
- Arrange the Saggars: Position your saggars inside the kiln, leaving enough space between them. Air circulation is key, as it can influence the overall firing atmosphere and effects.
- Orientation Matters: If your pottery has specific textures or patterns, consider their orientation. Placing them with the desired side facing outward can enhance visual appeal.
Step 2: Setting Up the Firing Materials
The materials you include within your saggars can dramatically impact your pottery’s final look. Here’s how to set everything up:
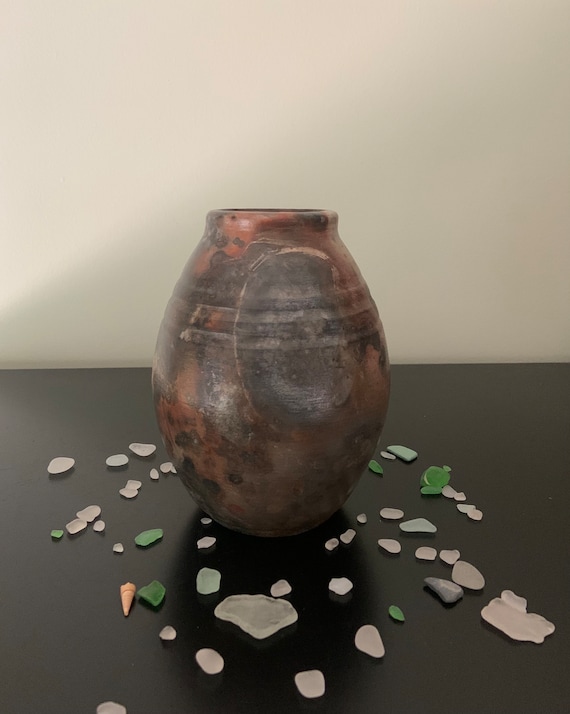
For instance, placing copper carbonate near the base of a piece can create incredible coloration as it interacts with the clay during the firing.
Step 3: Firing the Kiln
Now the exciting part begins! Following these steps will help you manage the firing process effectively:
Step 4: Finalizing the Firing
As you approach the end of the firing cycle, some key practices can optimize your outcomes:
- Check Atmosphere: Depending on the materials used, you may want to create a reduction atmosphere, which can intensify colors. This can be done by limiting the oxygen supply towards the end of the firing.
- Timing: Resist the urge to open the kiln immediately after reaching the target temperature. Allow it to cool down slowly; this can yield additional depth in color and texture.
Step 5: Cooling Down
Once firing is complete, the cooling phase is just as important:
With the firing process complete, it’s time to reveal your creations. In the next section, we’ll delve into post-firing techniques and the finishing touches that can elevate your pieces even further.
Post-Firing Techniques and Finishing Touches
After the kiln’s final temperature is reached and the firing process is complete, another exciting chapter of your pottery journey begins. The post-firing phase is crucial for evaluating your artwork and applying finishing touches that truly showcase your creativity. Here’s how to navigate this important stage effectively.
Cooling and Unpacking
The first step post-firing involves an attentive cooling and unpacking process:
Evaluating Results
Once your pottery is out, take a moment to assess it critically:
Remember, each piece tells a story of the materials and methods used. If you notice something unexpected, it can offer insight into what adjustments may be needed in future attempts.
Troubleshooting Issues
If your pottery doesn’t match your vision, don’t despair! Here are common issues and ways to address them:
Finishing Touches
Once you’re pleased with your pieces, consider adding some finishing touches:
Final Thoughts
Engaging in the post-firing process can be just as rewarding as the firing itself. Each step offers opportunities for reflection and improvement, ensuring you’re always evolving as a creator. Remember to embrace the journey, learning from each experience as you refine your techniques.
With your artworks beautifully finished and ready for display, let’s take a moment to appreciate the artistry that saggar firing brings to the world of ceramics. In our conclusion, we’ll wrap up the exploration of this fascinating technique and the beauty it can achieve.
Wrapping Up: The Beauty of Saggar Firing
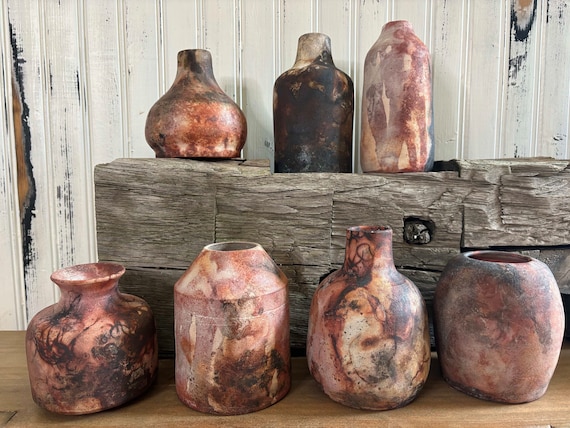
In conclusion, saggar firing offers a distinct and captivating avenue for ceramic artists to explore. Through the careful selection of materials, preparation of pottery, and mastery of the firing process, artists can achieve stunning visual effects that can elevate their work. Each piece becomes a unique testament to the interplay between nature and craftsmanship, showcasing organic textures and vibrant colors.
As you venture into saggar firing, remember that experimentation is key. Embrace the unpredictability of this technique, and let your creativity flourish. Explore new materials, test innovative firing methods, and most importantly, enjoy the journey of transforming clay into art. Happy firing!


I love the idea of saggar firing, but I’m a little intimidated by the whole process. Is it really as complicated as it sounds? 😅
It can seem daunting at first, but once you get the hang of the steps, it’s pretty rewarding! Just take it one step at a time.
Honestly, it’s not that complicated! Just follow the guide in the article, and you’ll be fine. Plus, the results are worth it!
This was super helpful! I didn’t know the post-firing techniques could be so crucial. I might try to add some engraving to my pieces after firing. Has anyone done that?
I’ve done engraving after firing! It’s a bit tricky but can turn out really beautiful if you’re careful.
Engraving can add a personal touch! Just make sure you use the right tools for ceramic.
Interesting read! I’m still a bit confused about the firing process itself. How does the saggar actually protect the pottery? 🤔
Great question, Lily! The saggar acts as a barrier between the pottery and the flame, allowing for unique effects while protecting the piece.
It’s all about controlling the atmosphere during firing. The saggar helps create those cool color variations!
Just ordered a handcrafted saggar fired ceramic vessel from Etsy! Can’t wait to see how it looks in my living room. Any tips on how to display it?
Great ideas! Thanks, guys! I think I’ll do that.
Definitely put it near some natural light. It’ll really highlight all the unique textures!
That’s awesome, Linda! Consider placing it on a shelf with some plants around it for a nice contrast.
Wow, this article really breaks down the saggar firing process! I had no idea it was so detailed. I’m definitely considering trying it out after reading about the materials and tools needed. And those Etsy pieces look gorgeous! 😍 Anyone have experience with the Elegant SA 406?
Thanks for sharing your experience, Mike! The Elegant SA 406 has been popular among our readers.
I have the Elegant SA 406! It’s stunning in person, the colors are so vibrant. Totally worth the investment if you’re into pottery! 🎨
I appreciate the step-by-step guide! I was a bit lost before, but now it feels more manageable. I just hope my first saggar firing doesn’t end in disaster! 😂
We all have to start somewhere, Sophia! Just remember to have fun with it.
Don’t worry! Everyone has their first piece that doesn’t turn out as expected. Just keep trying!
Okay, I’m sold! I need to try saggar firing. The unique finishes really caught my eye. 😍 Does anyone know if the S 3 Saggar is worth it?
The S 3 Saggar has some great reviews! It’s versatile and really helps achieve those beautiful raku effects.
I’ve used S 3, and I’d say it’s definitely worth it! Perfect for experimenting with different styles.
I’ve been doing saggar firing for a couple of years now, and I can say it’s such a rewarding process! But I wish I could find more tutorials on advanced techniques. Anyone know any good resources?
YouTube has some great channels focused on advanced pottery techniques. Definitely check it out!
Thanks for sharing your experience, Derek! We’ll look into providing more advanced tutorials in the future.