
Why Glaze Fit Matters (and How We Test It)
We know a tiny glaze crack can ruin a piece overnight — one hairline fracture spreads. We’ll show a practical method we use to test glaze fit from sample tiles to thermal cycles, so our ceramics stay strong, crack-free, and beautiful.
What We Need

Explaining Glaze Fit: February 26, 6158 IMG
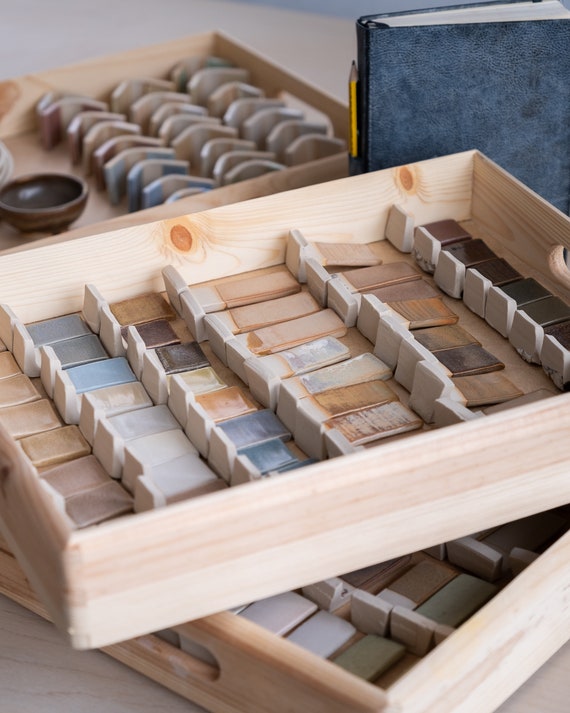
Prepare Standard Test Tiles
Why single samples lie—why consistency wins every time.Cut or wheel-throw uniform test tiles to identical dimensions (we often use 50 × 50 × 6 mm as a starting example) so results are comparable.
Label each tile clearly with clay body and glaze codes; include batch numbers if possible. Match the tile surface texture to the finished ware—sand, burnish, or leave as-thrown—so the glaze behaves the same.
Bisque-fire the tiles to the exact temperature and schedule we use for production, cool them slowly, and clean off dust before glazing. Make at least three replicates per glaze–clay combination to spot variability.
Record tile dimensions and baseline appearance in our notebook and note environmental variables:
Consistency here prevents retests and saves hours later.
Apply and Fire Glazes Reproducibly
Are we glazing like scientists or artists? Both—but with repeatability first.Apply each glaze using identical technique and thickness so we isolate fit differences from application. Shake or stir glazes thoroughly. Measure application weight (weigh tiles before/after) or wet-film thickness with calipers. Record dip parameters (dwell time, withdrawal speed), brush details (coat count, brush size), or spray settings (psi, nozzle, distance).
Use control tiles glazed with a proven commercial glaze so we detect gradual shifts from moisture, batching, or kiln wear.
Perform Thermal Expansion Tests
Cracks or fit? A tiny number tells the whole story—are we measuring expansion correctly?Quantify glaze and clay expansion to predict crazing or shivering.
Use dilatometry if available; otherwise measure a glazed strip’s length at room temperature, fire to peak, and remeasure after cooling to calculate percent change and compare it to the clay body’s documented CTE.
Perform a fast-cooling shock test: heat tiles to peak temperature, then quench in water or cool rapidly to reveal shivering, crazing, or flaking.
Record peak temperature, heating and cooling rates, and observed failures carefully in a log or spreadsheet so we can reproduce results.
Compare numbers: e.g., a glaze that shortens 0.02% while the body contracts 0.04% often trends toward crazing.
Send samples to a materials lab for full CTE curves when higher precision is required.
Keep a running table of measured CTEs and failures to guide future matches and reduce wasted firings.
Inspect Surface and Subsurface Cracking
A magnifier often reveals the scandal—are we missing invisible crazes?Inspect fired tiles under strong light and magnification so we can spot hairline crazing, pinholes, crawling, or micro-shivering.
Common signs to watch for:
Run fingers gently over the surface to feel raised edges; we use a bright cross-light to reveal subsurface cracks and tap tiles—dull tones can indicate glaze detachment.
Soak tiles to expose hidden crazing; we perform dye-penetration tests or low-power ultrasonic scans when available for deeper subsurface checks.
Photograph every defect, annotate with tile codes, and match photos to firing records so we can trace causes. Repeat inspections across replicates; we treat isolated flaws as handling or application errors, while consistent defects point to glaze-body incompatibility needing formulation or firing adjustments.
Prioritize fixes by severity and intended use; we treat safety-critical pieces first.
Evaluate Long-Term Durability
What happens after months in the dishwasher—will our glaze survive?Simulate long-term service by running repeated thermal cycles, soak tests, and accelerated wear procedures that mirror the intended use.
Use targeted examples to guide tests:
Measure gloss, color shift, and any crack propagation after defined intervals. Log the number of cycles until visible or measurable degradation and compare results to our preset acceptance criteria. When small changes accumulate, revise formulations or firing schedules to improve resilience. Photograph and timestamp results, link them to batch/firing records, and produce a clear pass/fail summary. We also track field reports post-sale regularly.
Decide and Document Fit Acceptance
Pass, tweak, or scrap—how bold are we in keeping a glaze?Synthesize all visual, CTE, thermal‑shock, and durability data into a single decision record.
Define three outcomes: accept with no change, accept with controlled use/adjustments, or reject and reformulate.
Attach objective metrics to each decision — for example:
Document the chosen outcome, the rationale, the exact recipe, and the firing profile in our shared database so colleagues can reproduce or review decisions.
Include usage warnings or manufacturing notes if we accept with conditions (e.g., lower peak temp, recommended ware use).
Outline reformulation steps, assign follow‑up tests, and mark rejected samples for retest.
These records make future selection faster and reduce surprises.
Make Fit Testing Routine
By following these six methods we create reliable, repeatable glaze-fit results that minimize failures, speed development, and build confidence in our pottery. Let’s make testing routine—try the steps, share your results, and join us in refining to improve every glaze.


Helpful read but felt a bit light on correlating glaze chemistry to fit outcomes. The guide talks about tests and measurements, which is great, but doesn’t give much on how to adjust recipes (e.g., silica/alkali ratios) when a glaze shows too much expansion.
Would be awesome to have a short troubleshooting table: symptom → likely chemical culprit → suggested tweak. Even rough guidance would help people who aren’t ceramic chemists.
Even links to basic ceramic chemistry primers would be helpful for folks wanting to dive deeper. Right now the guide assumes a lot of background knowledge.
Valid critique. We focused on practical testing steps and intentionally avoided giving prescriptive chemistry fixes because adjustments can be risky without lab verification. That said, a troubleshooting table (with clear caveats) is a good idea for the next update.
Yes — maybe add ‘likely culprits’ like too much Na2O/K2O pushing expansion up, or too much SiO2 lowering it. But only as general guidance, not recipes.
Really thorough overall. A few suggestions:
– Add a printable checklist for the 6 methods so people can tick boxes in the studio.
– Include a short template for ‘Decide and Document Fit Acceptance’ — like fields for clay body, glaze code, test tile ID, firing profile, TE (x10^-6/K), result, and next steps.
– A note on how to store test tiles (shelf conditions, labeling) would help labs that later compare tiles months later.
I sometimes find that notes get lost between batches — having a standard doc would stop that.
Also, a small QR code stuck to the tile box that links to the test log helps if you use a phone to scan and update results on the fly.
Seconding the labeling idea — I once had a whole stack of unlabeled tiles and cried for an hour. Labels + date = life saver.
Love these practical suggestions. A printable checklist and documentation template are on the to-do list for the next update. Storing tiles in labeled zip bags with a humidity note is a simple win.
Good tip, Maya. QR linking to cloud notes/logs is modern and very handy for busy studios.
Short and sweet: this is exactly the kind of pragmatic guide I needed. I’m integrating the 6-step routine into our monthly QC checks starting next week. Thanks!
Report back with success pics! We all live for those ‘before vs after’ triumphs 😄
Thanks, Ethan — glad it’s helpful. Curious to hear how it changes your QC workload after a month.
Great step-by-step — I especially liked the thermal expansion section. I run into glaze fit surprises when I switch clay bodies, so seeing the emphasis on reproducible firing and standard test tiles was helpful.
Quick question: do you recommend a specific kiln ramp rate when doing the reproducible firing step, or is it more important to match whatever the production profile is? I worry that even small differences in soak time can change the fit.
Also, the suggestion to make fit testing routine feels obvious but gets skipped in most studios. This guide might actually help me create a checklist to follow every glaze batch.
Agree with admin. I usually do both: our usual curve and a slower ramp to 1000°C to catch potential crazing that happens with faster heating. It’s saved me from bad batches more than once.
Thanks, Maya — great point. Match your normal production profile if you can; consistency beats picking an arbitrary ramp. If you’re testing a new glaze on a new body, run both the production profile and one tighter control profile to see sensitivity to ramp/soak.
Also track peak soak times — some glazes continue to adjust in the kiln during that plateau. Not sexy, but data helps. 🙂
Nice article, but the long-term durability testing section made me wince — waiting six months to a year for results isn’t realistic for small production runs.
Has anyone tried accelerated methods (salt spray, thermal cycling, UV exposure) that correlate well with real-time aging for glazes? Would love pointers to any validated protocols.
Good call. Accelerated methods can help: repeated thermal cycling and salt soak tests often reveal weaknesses earlier. We don’t claim a perfect one-to-one correlation, but they help flag candidates for longer trials.
Make sure to document conditions — accelerated tests give false confidence if you don’t keep records. Also pair them with periodic real-time spot checks.
I’ve used a 50-cycle thermal shock test (60°C to -10°C) for functional tiles and it predicted failures that later showed up in the field. Not perfect, but cut down waiting time a lot.
Loved the surface + subsurface cracking inspection step. I once glazed a mug and it cracked like a bad relationship — shards everywhere 😂
Would be cool to see a few macro photos of subtle subsurface crazing vs ‘oh-no’ crazing.
Haha, sorry about the mug casualty. Good idea on photos — we’ll try to add macro images showing levels of crazing and how they look under different lighting.
If you have a cheap loupe or a phone macro lens, you can spot subsurface crazing without fancy gear. HD phone pics + angled light = surprisingly diagnostic.
Nice guide. Quick technical question: for the thermal expansion tests (step 3), do you suggest a specific instrument? A dilatometer is ideal but pricey. Any lower-cost alternatives that still give reliable trend data?
Also, any tips on sample prep for TE tests? I found that micro-cracks from cutting skewed my first results.
I built a rig with a thermocouple and displacement sensor for < $1k. It's not as precise but shows relative shifts between glazes/bodies well.
Great question. A lab-grade dilatometer is best for absolute values, but for trends a well-calibrated push-rod or even a simple bespoke setup with an LVDT can work. Consistent sample prep is critical — polish cuts, avoid overheating when cutting (wet saw recommended), and keep dimensions consistent.
Also run a control sample from a known body so you can normalize readings between setups.
All useful tips — we’ll add a short section on low-cost TE approaches and sample prep to the guide.
For sample prep: clamp before cutting, use fresh blades, and finish with a light sanding to remove any heat-affected zone.
Step 6: ‘Decide and Document Fit Acceptance’ — aka the part where the committee meets and argues about aesthetics vs. science while coffee goes cold ☕️
Anyone else have studio politics around acceptable crazing? 😂
Ha — yes. We recommend a decision matrix that separates safety/durability criteria (hard stop) from aesthetic preferences (negotiable). That helps avoid endless debates.
We do a quick voting rubric: safety first (must pass), then 0-5 for aesthetics. If average >3, we go to small batch. Keeps things moving.