
From Clay to Kiln: Why We 3D Print Ceramics
We love 3D printing ceramics because it gives us PRECISION, allows complex forms, and speeds prototyping. In this guide we share a practical, start-to-finish workflow so we can turn raw clay into fired, functional pieces with confidence and care, together.
What We Need Before We Start
Firing Clay in the Kiln: The Clay Process Explained
Step 1 — Design with Clay in Mind
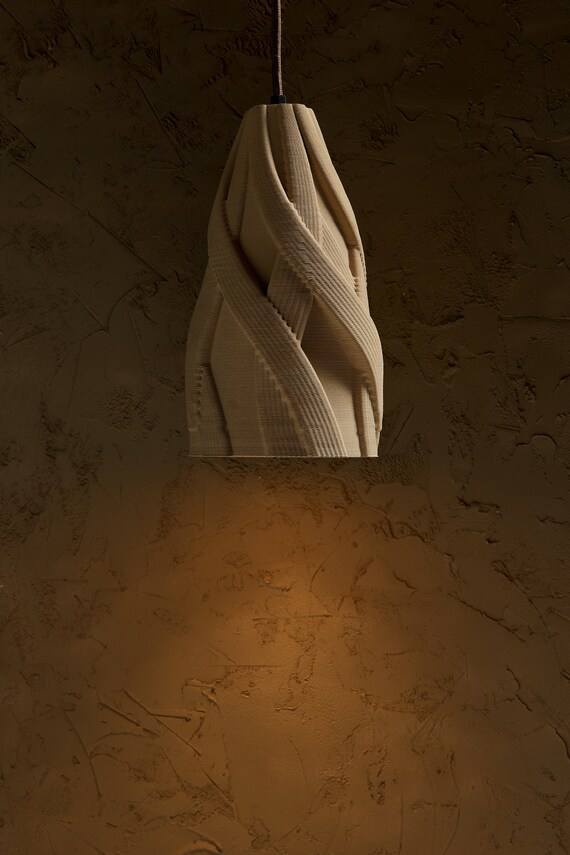
Can our CAD choices make or break the piece? Yes — and here’s how we avoid rookie mistakes.Design with clay properties in mind: optimize wall thickness, avoid unsupported overhangs, and build in shrinkage and drainage allowances from the start. Translate sculptural concepts into printable geometry by simplifying tiny filigree, strengthening thin fins, and splitting complex pieces into joinable panels.
Check these key parameters before exporting an STL:
Tune parametric features for paste or slip printing: widen extrusion widths (1.2–1.6× nozzle), increase layer overlap, and add gentle draft angles to reduce stress. Orient parts to minimize height and large unsupported spans—print cups on their side to reduce long vertical walls, or split tall vases into stacked segments. Export clean, manifold STLs and keep filenames that include clay type and shrink factor so our workflow stays organized.
Step 2 — Prepare the Clay Paste (Slip) or Filament
Why a single recipe won’t cut it — small tweaks save whole pieces from collapse.Sieve the clay and additives to 60–100 mesh to remove grit and lumps. De-air the batch in a vacuum pug or by letting slip rest; remove visible bubbles before loading the extruder. Adjust solids percentage by adding water or clay: aim for paste slips ~55–65% solids (by weight) for most screw extruders, or follow your filament maker’s spec.
Perform simple rheology checks. Print a 50×100 mm bench test with a 5 mm wall and a 45° overhang. Measure sag after 5 minutes — target <2–3 mm. Print a 10 mm single-line bridge to check collapse. Remix with 1–3% bentonite or deflocculant in small increments if flow or cohesion needs tuning.
Dry down or remix stubbornly wet slips by adding powdered clay incrementally; re-sieve after drying. Store slips in airtight, labeled containers (clay type, solids %, date, operator). Avoid contamination: use dedicated tools, clean buckets, and cover between uses. Wear a dust mask and gloves when handling dry materials, and keep violent stirring to a minimum to reduce air entrainment.
Step 3 — Calibrate the Printer and Extruder
A few minutes of calibration can save hours of rework — here’s our quick checklist.Choose a nozzle size appropriate for clay: 1.5–4.0 mm for paste extrusion. Set layer height to 30–70% of nozzle diameter (e.g., 1.5 mm nozzle → 0.5–1.0 mm layers). Set initial extrusion multiplier/flow to 100% and plan to tune.
Set these baseline parameters:
Perform the calibration routine:
- Print a single-line extrusion test (100 mm long, single pass).
- Measure line width and thickness; adjust extrusion multiplier or volumetric flow until dimensions match target.
- Print a small hollow cylinder (20–30 mm diameter, 3–6 mm wall) to check wall integrity and interlayer bonding.
- Observe for gaps, collapses, or over-extrusion; tweak flow, speed, and pressure/volume curves (pressure advance) and re-run tests.
Document settings and retest after any material or temperature change.
Step 4 — Print Smart: Strategies During Printing
Slow and steady? Sometimes. Fast and clever? Other times. We choose moves that reduce cracks and collapse.Secure the part to the bed using reliable adhesion. Use gummed paper or a thin slip slurry brushed on the bed; both give strong grip and peel off cleanly when leather-hard. For small bases, add a sacrificial brim.
Stabilize delicate features with simple printed supports or temporary fillets. Print thin vertical spines with wider bases, add short radial ribs, or print a light lattice under long overhangs to prevent sagging.
Control the environment: keep the room draft-free and maintain steady humidity (aim for roughly 40–60%). Use a draft shield or enclosure to avoid skin cracking and uneven drying.
Monitor the print actively. Watch the first 3–5 layers for adhesion and uniform bead width. Pause the print to fix minor defects—trim a blob, reapply slip, or realign a strip—then resume.
Manage top-heaviness with incremental-wall tactics: build lower sections slightly thicker, taper walls outward, or pause between higher sections to let structure firm.
Design assemblies with built-in shrink allowances. Allow test fits and add clearance (typically 0.5–2 mm depending on clay and expected 5–15% shrinkage); print a small test connector before committing to full assemblies.
Step 5 — Drying, Cleaning, and Leather-Hard Finishing
Drying is when many prints fail — how do we protect our pieces without slowing the whole shop?Control drying. Cover prints loosely with plastic or a damp cloth to slow evaporation, then move to a steady, draft-free space or a humidity room (40–60%). Expose pieces gradually—uncover edges first, then the whole piece—to prevent warping in thicker sections.
Trim and refine at leather-hard. Use a fettling knife, loop tool, and rib to trim seams, thin bases, and tidy joins. Join parts by scoring, applying slip (thick slurry), and pressing; blend seams with a damp rib or fingertip to hide joins. Remove stray strings and support scars with a sharp knife, then smooth with a sponge.
Repair small defects. Patch pinholes or cracks with slip, compressing to expel air; scrape off excess and re-smooth. For trapped bubbles, cut and rejoin with fresh slip.
Follow drying and bisque timing guidelines:
Avoid trapped moisture: vent closed cavities, hollow bulky parts, and weigh pieces or tap for a high, dry sound before firing.
Step 6 — Firing and Glazing for Durable Results
Can we glaze a 3D-printed ceramic like wheel-thrown work? Absolutely — with a few caveats.Plan a two-stage firing: bisque to mature the printed body, then glaze to seal and finish. Use slow ramps and holds to avoid steam expansion and cracking.
Apply glaze to respect layer texture. Brush or spray thin coats to avoid pooling in layer seams; use wax resist on bases and overhangs. For heavily textured prints, test-spray glaze or rub-on slips to keep texture visible.
Troubleshoot runs or craze by reducing coat thickness, lowering melt temperature, or reformulating glaze for better thermal fit. If cracking appears, slow the ramp and add longer holds through 100–400°C.
After firing, clean kiln wash, smooth sharp edges with a diamond pad, and evaluate: check dimensional accuracy, surface finish, strength, and glaze fit against our original design goals.
Final Thoughts: Iterate, Learn, Repeat
We recap that careful design, paste prep, calibration, patient drying, and controlled firing make reliable ceramic prints; iterate, log results, and refine each step—give it a try, proudly share your outcomes, and join us in improving our craft together today.


This is great but ngl, getting my FDM-turned-slip rig to not wig out felt like wrangling a gremlin 😅
I had the extruder skipping a lot — turned out to be tiny air pockets in the slip. Purged for like 15min and then smooth as butter. Also, typo on page 7? ‘extruder presure’ lol. 😜
Haha thanks for the catch, Nina — fixed the typo. Air pockets are the worst; we’ll add a short checklist for degassing slips before loading.
Lovely guide and the ‘Iterate, Learn, Repeat’ ending is my vibe. A few friendly notes:
– Took me three tries to get the glaze not to crawl off the lip.
– Patience during drying is underrated.
Keep the case studies coming — seeing mistakes and fixes is way more useful than perfection.
Yup, glaze crawling often from oily fingerprints or underfired bisque. A quick wipe with rubbing alcohol before glazing helps sometimes.
Thanks Sophie — totally agree. We’ll add a short case study section with common glaze fails and how we fixed them.
Great article. Quick comparison question: when would you recommend using clay filament vs slip extrusion? I get that filament is cleaner, but is it worth losing some of the organic qualities of slip?
I’m experimenting with filament for structural pieces and slip for more organic vases. Also — any pointers on rehydrating filaments that feel a bit dry?
Good comparison. We prefer slip for sculptural, organic forms because of surface finish possibilities and layering; filament is better for repeatable structural parts and faster setup. For rehydration, we recommend a mild humidify chamber at low temp or short soak with controlled drying — but be careful, it changes consistency.
I’ve had success gently warming filament then storing in a plastic tub with a damp sponge for a few hours — then push slowly to avoid cracking.
Also consider mixing a tiny bit of fresh slip into the filament base (if compatible) to tweak flow — experimental but can help.
If you rehydrate, run a test print first — the mechanical properties shift and you don’t want a large failed piece.
Love the step-by-step — super thorough! A few notes from my own experiments:
1) Your slip consistency section saved me — I was overwatering and getting collapse.
2) Drying times vary SO much with humidity; I now tent things for longer.
3) When you said ‘leather-hard finishing’, I wish you’d added a short bit about scoring for joins.
4) One tip: use a damp box for the first 24–48 hours to avoid cracks.
Hope that helps — thanks for sharing all the photos, they made the process feel doable!
Thanks Maya — great practical tips. We’ll add a note about scoring joins and a short humidity table in the next update.
Would love to see your photos of the damp box setup if you’re willing to share 🙏
Totally agree about the damp box. I wrap pieces loosely in a plastic tote with a wet sponge — way fewer stress cracks.
Question about nozzle size vs clay granularity — anyone found a sweet spot? I tried a 1.2mm nozzle with a coarser slip and got clogging. Switched to 1.8mm and flow was smoother but detail suffered.
Also, does anyone have a rule-of-thumb for extrusion pressure changes during tall prints? My top layers seem thinner.
Also check your hopper for sediment — sometimes coarser bits settle and cause intermittent clogs.
I use 1.6mm as a compromise for medium grits. For tall prints I slowly ramp up pressure by like 5-10% every 10mm — helps, but you need to tune per clay.
I’ve had luck using a dual-extrusion profile — heavier first layers for stability, then a finer profile for top details.
Totally — and keep an eye on temperature/humidity if you use slip; it affects viscosity and clogging too.
Great question, Liam. We generally recommend starting with a nozzle ~3x the median particle size. For tall prints, try a small incremental increase in extrusion multiplier and slow the layer speed slightly; we’ll add a mini-table to the guide showing our tested ranges.
Short and sweet: I appreciated the ‘Print Smart’ strategies. Especially the part about adding sacrificial brims for thin bases.
No drama, just practical stuff I can use tomorrow in the studio.
Nice guide. One tiny gripe: the printer calibration section could use more screenshots. I’m visual, ok? 😅
Good point, Tom — we’ll add step-by-step calibration screenshots in the next revision.
Amazing walkthrough. Couple of glaze questions: do you bisque at the same temp you list for all clay bodies? And do you do single or double bisque/glaze firings?
I usually bisque at cone 06 and glaze fire to cone 6, but some textures react oddly. Curious what your workflow is.
Thanks Carlos. We typically bisque to cone 04 for most bodies used in the guide and glaze fire to cone 6 for durability. We sometimes do two bisques for very porous/sandy clays, but it’s situational — we’ll add a decision flowchart for firing schedules.
If texture is changing weirdly, check if the glaze fit is off or if there’s underfiring — sometimes the clay needs a slightly higher bisque to stabilize.