
Why Pottery Workshops Power Experiential Retail
We believe hands-on pottery is one of the strongest ways to turn casual shoppers into brand advocates. Getting customers’ hands dirty drives footfall, increases dwell time, and creates authentic social content. It also opens diverse revenue streams, from ticketed classes to retail sales and private events.
In this playbook we give practical, shop-ready ideas. We show how to match workshop formats to your brand, design the guest journey, set up safe retail studios, and build lesson plans that teach and delight. We also cover hiring and training, plus monetization, marketing, and ways to measure impact. Read on for step-by-step guidance to launch and scale pottery experiences in your retail space. We make it practical.

Hand-Building a Pot with Coiling: A Pottery Creation
Defining Goals and Formats: Match Workshops to Your Brand
Before we design a single lesson, we clarify why we’re running workshops. Are we driving immediate retail sales, growing a community, collecting emails, or elevating brand perception? Pick a primary objective and one or two secondary KPIs (sales lift %, new emails/week, repeat attendance) so programming choices directly support measurable outcomes.
Quick steps to clarify objectives
Workshop format taxonomy — what works and when
Picking the right mix for your footprint and customers
For a 400–800 ft² boutique prioritize drop‑ins and pop‑ups to maximize reach; keep classes under 12 people and 60–75 minutes. Flagships with studio space can run multi‑week tracks and VIP series to cultivate repeat buyers. If your core customers are families, schedule weekends and shorter sessions; for professionals, evenings and multi‑week skill paths work better. We recommend piloting two formats for 6–8 weeks, tracking conversion and NPS, then doubling down on the highest ROI format.
Designing the Guest Experience: From First Contact to Finished Piece
Booking & pre-class touchpoints
We start the journey at booking: a clean calendar, clear class descriptions, and automated reminders. Use a booking tool that supports SMS and waivers (Square Appointments, FareHarbor, or Bookeo). Send a confirmation with a 60‑second demo video, what to wear, parking/arrival map, and add‑on options (glaze upgrades, takeaway kits). Pro tip: after adding a 2‑hour reminder with a short host photo, we cut no‑shows by roughly 25–35%.
Arrival and welcome rituals
First impressions matter. Greet guests by name, offer a welcome drink, and guide them to a simple welcome desk with name tags, lockers, and a “today’s flow” card. Our standard opening includes a 3‑minute safety checklist and a 5‑minute demo at the wheel or slab table so everyone feels confident immediately.
Instruction, sensory cues and choices
Keep instruction modular: demo → guided practice → independent time → glazing. We staff at a 1:8 instructor-to-guest ratio and lay out glaze stations with labeled sample chips and scent‑neutral work surfaces. Use tactile cues (“press here,” “lift gently”) and sensory language to coach form. For firing, choose a kiln sized to your throughput (Skutt KM series for higher volume; Paragon models for smaller shops) and track pieces with numbered tags and digital logs.
Photography, packaging and post-event follow-up
Create a branded photo wall and a simple lighting kit (Neewer 18″ ring light + phone tripod) so guests leave with shareable images. Package finished work in kraft boxes with padding, a care card, and a small branded sticker. Offer shipping (USPS flat rate or regional carriers) with tracking. Follow up within 48 hours with professional photos, a replay link, care instructions, and a 10–15% discount on future classes — we find this drives repeat bookings and social shares quickly.
Studio Setup: Layout, Equipment and Safety for Retail Spaces
Flow & instructor visibility
We design for sightlines: a central demo zone with a raised platform or stool lets instructors be seen by all. Aim for 36–48″ clear aisles and 1 instructor per 6–8 guests for hands‑on classes. If converting a shop corner, use mobile benches to open retail flow after hours.
Essential equipment and examples
Choose durable, retail-grade tools that balance cost and reliability.
Storage, ventilation & cleaning systems
Install open wire shelving for dry storage, lockable cabinets for glazes, and numbered cubbies/drying racks on casters. Protect drains with a clay trap and use a dedicated wash sink (washbowl) with splash guards. For dust control, use a HEPA‑rated shop vacuum (Festool CT or Nilfisk equivalent) and a local exhaust or ducted vent hood in glazing/firing zones.
Safety, age adjustments & compliance
Implement PPE stations (gloves, aprons, goggles), silica‑safety practices (no dry sweeping), kiln‑room separation with clear signage, and Class A/B/C fire extinguisher access. For kids: offer hand‑building classes only, lower bench heights, and non‑toxic, lead‑free glazes. Require signed liability waivers at booking and wristbands for minors.
Insurance basics & accessibility
We recommend general liability plus property insurance that explicitly covers ceramics activities; discuss pulsed kiln use and retail classes with your broker. Make spaces ADA friendly: 34–36″ table heights, knee clearance, and step‑free access so workshops are welcoming and compliant as you scale.
Curriculum and Lesson Plans That Teach and Delight
Modular templates we actually use
We build four repeatable templates so instructors can pick, plug and teach with confidence.
Assessments, scaling & progression
We measure success by completed bisqueable pieces, repeat bookings, and social posts. Quick checks: symmetry, functional joins, and glaze coverage. To scale, standardize demo scripts and supply pre‑measured kits; deploy teaching assistants trained on the same checklist. Build progression by offering “next step” vouchers and skill‑based badges that encourage return visits.
Next, we’ll translate these plans into people processes — hiring, training and running workshops smoothly.
People Power: Hiring, Training and Running Workshops Smoothly
Recruiting instructors and cross-training staff
We hire for two things: craft skill and warmth. Look for candidates with teaching experience (community college, artist‑in‑residence, or previous studio lead) and strong front‑of-house instincts. Cross‑train retail associates to assist classes — at our shop, training a retail lead to prep clay cut our setup time by about 20%.
Shift design that balances class and retail
Stagger class start times (e.g., 11:00, 14:00, 17:30) so one staff member can open the floor for sales while another runs a session. Use a float role that covers walk‑ins, kiln moves, and the first ten minutes of cleanup. Track peak retail vs class hours for two weeks to optimize schedules.
Teaching mixed‑ability groups
Train instructors in micro‑differentiation: give one demo, then offer 3‑tiered challenges (beginner, intermediate, stretch). Use quick assessment cues — hand posture, clay moisture, eye contact — to decide when to offer one‑on‑one help. We script three short interventions (“try this,” “watch me,” “give it a moment”) so feedback is consistent.
Brand hospitality and upsell moments
Align greetings, music, and drink options with brand tone. Teach staff soft‑sell lines tied to outcomes: “If you loved that texture, our underglaze sampler makes the finish pop—can I add it to your kit?” A discreet sample table (underglaze tester tiles) converts interest into add‑ons.
Safety, difficult situations and practical tools
Required trainings: kiln safety, ergonomic lifting, allergy awareness, and COVID/illness protocol. Role‑play common conflicts (late arrivals, intoxication, disruptive guests) and use a de‑escalation script.
Ready‑to‑use scripts & checklists
Pre‑class setup checklist:
In‑class pacing script:
Conflict resolution script:
Cleanup checklist:
Recommended kit highlights: Rode Wireless GO II (voice clarity), Hedley & Bennett canvas aprons (durability), and a compact wheel like Shimpo for demos — reliable in busy retail settings.
Monetization, Marketing and Measuring Impact
Pricing structures that actually sell
We price for clarity and choice. Typical structures that work in retail studios:
Example: we raised glazing add-on to $15 and conversion climbed from 22% to 36% once we showed finished samples.
Upsells and cross-sells that feel natural
Tie retail into the craft moment with items people already want:
We keep a small sample table near the exit for impulse buys — conversion is surprisingly high.
Promotions tuned to experiential retail
Use channels that showcase activity and story:
We use Square + Bookwhen (or Mindbody) to unify bookings and retail sales for promotion tracking.
Metrics and rapid feedback loops
Track a handful of KPIs and iterate fast:
Feedback loop: automated 48‑hour survey → weekly ops review → monthly A/B tests on price/add‑on → implement winning changes. This keeps offerings fresh and profitable as we scale into the Conclusion section.
Bringing the Playbook to Life
We’ve laid out a clear path: define goals and formats, set up a safe, welcoming studio, build tight lesson plans, and train a team to lead with confidence. Start small, test formats, and iterate based on real guest feedback so workshops fit our brand and space.
Measure impact with simple KPIs—attendance, spend per guest, repeat bookings and NPS—and promote launches with targeted marketing. We encourage incremental investments, creative partnerships, and a habit of listening. Launch one confident offering, collect data, refine pricing and curriculum, and scale when the experience consistently delights customers over the coming seasons.


Short and sweet: this playbook is the blueprint I wish I’d had when opening my first studio. The Bringing the Playbook to Life section actually made me book a demo night.
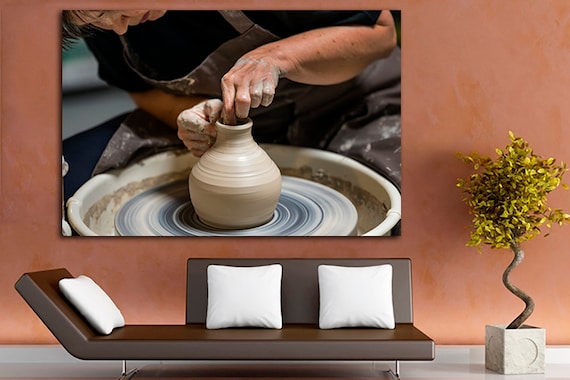
Also — the Custom Durable Apron and the Ceramic Wall Art Canvas Print are worth stocking in-store. People loved the aprons as teacher merch!
Love the apron merch idea — wear it in photos and people want it IRL.
So glad it helped, Evelyn! Aprons as teacher merch is a nice revenue + branding move.
Really useful article, but a small constructive note: the hiring section felt a little light on specifics. You mention onboarding and role clarity, but I wanted templates — interview questions, trial-shift checklists, or a 90-day training plan would be awesome.
Also, shoutout to the Ceramic Wall Art Canvas Print idea for retail — lovely impulse buy for shoppers who want a memento rather than a hand-thrown bowl.
If helpful, I can share a starter 90-day checklist in a reply — includes safety checkpoints, curriculum shadowing, and guest-hosting milestones.
Agree about the hiring section. For anyone hiring assistants: try a paid 2-hour trial shift to assess teaching vibes and safety habits.
Thanks Noah — paid trial shifts are smart. I worry about cost, but it filters the right people.
Fantastic feedback, Rebecca. We can definitely add an appendix with sample interview questions and a 90-day training template in the next update. Thanks for calling that out — really helpful.
Please do — that would save so much time.
Monetization advice was solid. The tiered pricing idea (intro class, follow-up glaze session, VIP private booking) is something I’m stealing.
Small Q: has anyone priced ceramic wall art canvas prints as a cross-sell? Are they a quick win or a dead-end product?
We sold a bunch at $25 each as impulse buys. If you pair them with a discount when they book future classes, conversion goes up.
Canvas prints tend to be a quick win if they match your studio’s aesthetic and are priced modestly. People who don’t want messy clay still want a keepsake. Keep them near checkout at a visible price point.
This playbook nailed the “Defining Goals and Formats” bit. We were torn between 1-hour intro sessions and multi-week classes.
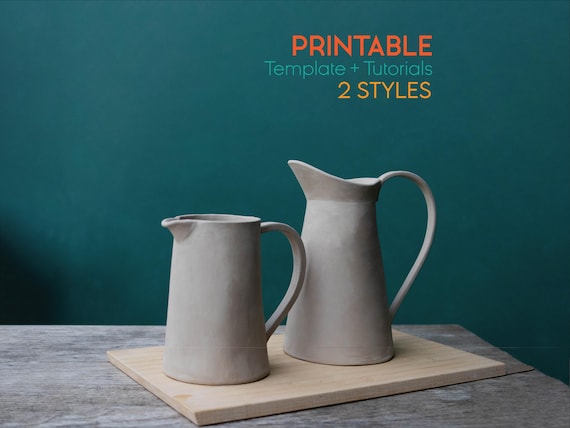
Ended up using the printable templates (Printable Jug and Washbowl Slab Pottery Template + Two-Style Printable Slab Pottery Jug and Vase Template) as takeaways and it boosted sign-ups.
Anyone else using templates as a lead magnet or upsell? Curious about best delivery (printed vs emailed PDF).
That’s helpful, Rosa — thanks! We might try both. 🙂
Great point, Maya — printable templates work well as both pre-class prep (emailed PDF) and a physical takeaway. If you want people to bring them to class, email ahead. If it’s a post-class upsell, print them on heavier card stock.
We email the PDF a day before and also hand out a printed cheat-sheet during the session. People like both — email for prep, print for the studio.
Love the curricular focus here — “Curriculum and Lesson Plans That Teach and Delight” is such an underrated area.
I run weekend family sessions and used the Two-Style Printable Slab Pottery Jug and Vase Template to scaffold exercises for kids vs adults. Worked really well.
Couple of tips from my experience:
– Start with a fun 5-min demo every time.
– Keep materials lists short and standardize on a few glazes.
– Use the throwing gauge only as an optional tool for advanced students.
Also, the article could expand on assessment rubrics — how do you evaluate “delight” vs technical skills? 😊
Love these practical tips, Aisha — especially the demo-first approach. Adding assessment rubrics is a great idea; we can include simple outcome metrics (finished piece, glazing done, guest satisfaction) in an update.
That three-point scale sounds perfect, Ethan. Will try next weekend.
For rubrics we use a three-point scale: form, finish, and experience. Keeps feedback positive and actionable.
Great practical guide — I actually bookmarked the studio setup section. Loved the checklist for layout and safety.
Question: has anyone used the “Custom Durable Apron for Pottery Studio Work” listed in the article? Does it hold up after multiple glazing sessions? I hate aprons that soak through.
Also, the advice on wheel spacing was super helpful. Definately using the gauge suggestion for class consistency.
Thanks Liam — glad the setup checklist helped! The Durable Apron mentioned is aimed at heavy studio use; reviewers said the material resists glaze and is washable. For a busy retail studio I’d recommend ordering one to test and keeping extras for students.
If you expect a lot of slip/glaze, consider adding a cheap vinyl layer underneath or an under-apron. Saved us in our first month.
I got that apron last year for our pop-up workshops — 10/10. Stains wipe off and it’s sturdy. Only gripe: the neck strap took a week to feel comfy 😅
I came for the zen and left with clay on my sneakers. Worth it 😂
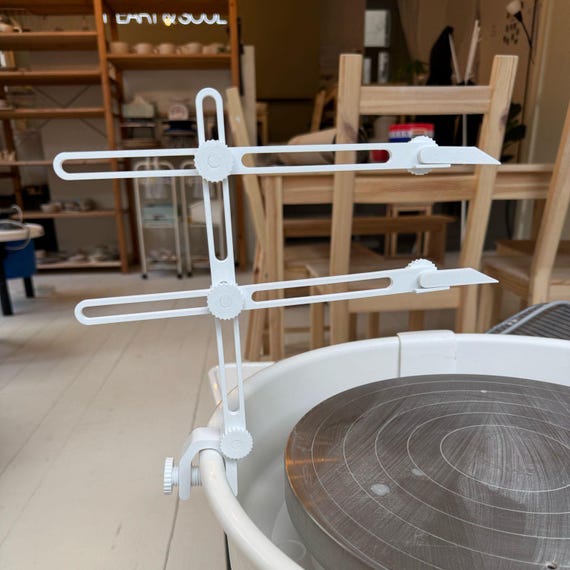
On a serious note: the Adjustable Two-Armed Pottery Throwing Gauge seems like the secret weapon for consistency. Does it slow down the creative chaos?
Ha — clay sneakers are a rite of passage. The two-armed gauge helps teach repeatability (esp. for retail product lines) without killing creativity. Recommend using it in later parts of class when students are ready to refine pieces.
It doesn’t kill creativity — it just gets rid of the “why is mine huge” panic. Use it after the rough shaping stage.
Great read. Studio layout section saved me weeks of trial and error — particularly the bit about traffic flow and glazing stations.
Question: what are people’s go-to ventilation and dust-control hacks for a small retail space? We don’t have much room for industrial gear, and clay dust freaks me out (health-wise).
Oh and the Adjustable Two-Armed Pottery Throwing Gauge got a shoutout here — totally recommend it for consistent demo pieces.
If you want, I can list a few recommended purifier models that balance price and coverage.
Diego — ventilation is vital. Use a HEPA vacuum at the end of the day, wet-clean surfaces to avoid airborne dust, and if possible add a wall-mounted air purifier rated for dust/particles. For glazing, consider a small downdraft table or do glazing near an open door/window.
Wet clean and HEPA filters saved us. Also, require masks during finishing/grinding stages and post signs reminding staff to clean up.
Thanks! Wet-clean routine sounds doable. Might invest in a good HEPA unit next quarter.