
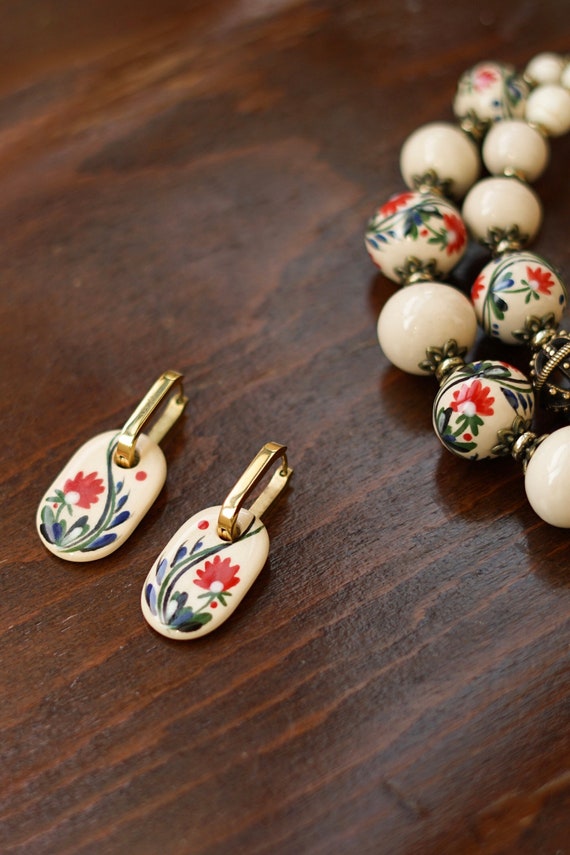
Make Wearable Ceramic Jewelry in Six Friendly Steps
We’ll guide you through six friendly step by step techniques to plan, form, fire, glaze, and assemble wearable ceramic jewelry—simple, repeatable methods that deliver beautiful, durable results every time.
Requirements — What We Need Before We Start
We need clay (porcelain or stoneware), tools (blades, ribs, needles, sponges), kiln access, glazes, findings, adhesive, sandpaper, handbuilding skills, patience, mask, gloves, curiosity.
Crafting Ceramic Jewelry: Step-by-Step Handmade Techniques
Step 1: Plan Like a Pro — Choose Clay, Scale, and Style
Do we want feather-light studs or bold statement pieces? Choices now save heartbreak later.Choose the right clay, scale, and attachment method before we touch clay. Decide whether we want delicate porcelain (beautiful, brittle) or sturdy stoneware (durable, more glaze choices). Sketch simple shapes and make paper templates to test proportions against the ear or neck.
Highlight the essentials:
Measure, note dimensions for cutters or molds, and confirm glazes that match the chosen clay before forming.
Step 2: Prepare Materials and Tools — Set Up for Smooth Workflows
A tidy table protects more pieces than luck ever will — here’s how we organize for success.Prepare our workspace and materials carefully: consistent prep equals consistent results. Wedge or pug clay until it’s homogeneous and free of air pockets. Condition clay to the right softness for the method we’ll use.
Roll slabs between two calibrating sticks with a rolling pin (e.g., 3 mm sticks for thin earrings). Compress coil joints firmly with a moist finger. Lightly lubricate press molds so pieces release cleanly. Cut shapes with cutters or paper templates.
Essential items to have ready:
Label parts, photograph layouts, and arrange padded surfaces and findings so assembly flows smoothly after firing.
Step 3: Form Your Pieces — Shape, Texture, and Hardware Integration
Want a crisp geometric pendant or an organic bead? We use techniques that get both right fast.Shape our pieces using techniques that suit the design and clay: pinch for organic beads, cut slabs for geometric pendants, or press‑mold for repeatable shapes. Keep even thickness—aim for 3–6 mm for earrings and pendants—to balance weight and strength. Add texture with stamps, slip trails, or found objects; refine edges with a rib and a damp sponge.
Insert hardware loops before firing (use pre‑fired loops or carve them in clay) or pierce leather‑hard with a needle tool; enlarge holes slightly to allow for shrinkage. Score and slip cleanly for multilayer joins. Keep test samples, note glaze orientation, photograph pieces, label clay and date, and record lessons learned.
Step 4: Dry and Refine — Leather‑Hard Tricks for Clean Results
Slow drying feels boring but it’s our secret to crack-free, wearable pieces that last.Manage drying with patience to prevent warping and cracking. After shaping, we cover pieces loosely with plastic or a damp cloth to reach leather‑hard; we check daily and rotate for even drying to avoid one-sided warp.
Refine profiles by trimming edges and thinning attachment points—use a fettling knife, loop tool, or needle tool. We burnish selected areas with a smooth rib or the back of a spoon for a satin sheen. Use small knives or fine files to create clean bead holes and precise seats for inlays.
Insert stainless findings now for a snug fired fit, or we push measured probes (toothpicks/steel pins) where posts will go and mark positions. We avoid drafts and rapid humidity swings.
Step 5: Bisque and Glaze — Make Color, Not Weight
Thin layers often read richer than glops of glaze — testing beats guessing every time.Bisque-fire pieces to our kiln’s clay-specific schedule so they harden and become porous for glazing. Clean bisqued surfaces with a soft brush or damp sponge to remove dust. Test small glaze swatches on the same clay body to confirm color and texture.
Apply glazes thinly and evenly for jewelry—use feathered brushwork, underglaze patterns, or a light mica wash to add character without bulk. Avoid glazing interior attachment areas or holes that need mechanical joins. Use kiln wash and stilts to prevent sticking.
Check compatibility and firing order for metallic lusters/overglazes. Keep a detailed log of recipes, application thickness, temperatures, and test results, and run allergy-friendly skin tests, noting any irritation observed.
Step 6: Final Firing and Assembly — From Kiln to Closet
The kiln finishes the clay, but our finishing choices decide whether jewelry survives everyday life.Fire the kiln on a gentle ramp-and-hold schedule to mature glaze and clay—slow ramp and long cool to protect thin or pierced pieces.
Inspect each cooled piece carefully and sand rough edges with fine wet‑sandpaper (e.g., 600–1200 grit). Polish with felt pads or a soft wheel if needed.
Attach hardware: use high-strength jewelry adhesive for glued joins, or set posts and jump rings through pre-fired holes and add tiny washers for durability. For mixed-media, secure metal parts with a jewelry-rated epoxy and cure fully before handling.
Finish with a protective micro-coating when appropriate, photograph under consistent light for records, store in anti-tarnish pouches, label gentle-care instructions, and spot-test pieces before extended wear.
Conclusion — Start Making and Keep Learning
We’ve outlined six practical steps to craft durable, beautiful lovely ceramic jewelry; with planning, careful forming, controlled firing, and thoughtful finishing, we’ll make wearable pieces we’re proud to wear. Ready?


Nice breakdown. I’m curious what kiln temps people actually use for small jewelry pieces — do you drop to lower cone numbers to avoid warping because pieces are thin? Any tips for slow cool schedules for delicate forms?
Thin pieces benefit from gentle ramps and slower cooling to reduce thermal shock. Many artists bisque at cone 06 and glaze fire depending on clay/glaze (for earthenware maybe cone 06–04; for stoneware cone 5–10). Slower cooling near peak is helpful — hold or slow ramp down through 900–600°C area if your kiln allows.
I usually lower the ramp speed after 1000°C for thin pendants. Also, don’t stack thin pieces until they’re fully stable — space them out to avoid warping.
Tried Step 3 last weekend — made some textured discs with a fork and they turned out SO cute 😍
The hardware integration tips saved me a lot of trial-and-error. Will be making more for gifts!
Love the humor in ‘Make Color, Not Weight’ — made me chuckle. Quick note: the gallery pics made me want to quit my job and make earrings full-time.
Haha, glad that line landed! If you do quit, send pics of the first batch 😉
Solid step-by-step. Some constructive feedback though:
1) The section on clay scale could use a short chart or quick examples (earring studs vs pendants vs bangles — what body count of clay?)
2) The bisque/glaze temps are mentioned but not a recommended range for beginners — could confuse people using stoneware vs earthenware.
3) Maybe add a short troubleshooting list for common glaze problems (crazing, pinholes, running).
Overall very helpful and friendly tone — just needs a few practical quick-references.
Agreed about firing ranges. For beginners: bisque around cone 06–04 for earthenware, cone 06–04 is common; stoneware glaze firings vary a lot (cone 5–10). But check clay/glaze labels!
Good point, Carlos — an accessibility note for different kiln types is on the edit list as well.
A small chart would be so helpful — especially for those of us learning the difference between clay bodies.
Thanks, Priya — all great suggestions. We’ll look at adding a quick-reference chart and a beginner-friendly firing range. Crazing/pinholes are super common; we’ll include a troubleshooting list in the next edit.
Also, a quick cheat-sheet for kiln-sitters vs digital controllers would be neat. Not everyone has a fancy controller. 😅
I skimmed to the final firing and felt a tiny panic attack thinking about putting metal through the kiln. lol
Is there a list of which jump rings/eye pins survive firing? Or is it always ‘attach after’ to be safe?
Most common practice is to attach metal after final firing unless the metal is specified as kiln-safe (like some stainless or specialized kiln-friendly metal). We try to call out when hardware can go in early — if in doubt, add after to avoid oxidation or melting.
Loved the conclusion — ‘Start Making and Keep Learning’ is perfect. One tiny nitpick: the phrasing around ‘make color, not weight’ confused a friend who thought it meant use lighter glazes 😂. Maybe reword slightly?
Thanks, Olivia — good catch. We meant color impact without making pieces bulky. We’ll tweak that line for clarity.
This guide is super approachable — I appreciate the friendly step breakdown.
I tried the leather-hard tricks from Step 4 yesterday and they helped a ton with cleaner edges.
Question: how long do you usually wait before trimming for small earrings? I live in a humid climate and I’m paranoid about cracking.
Also, any tips for integrating jump rings before the first firing vs after? Thanks!
I live in a pretty damp place too — I speed-dry with a fan and cover with plastic to even out drying. Trimming around 30–40% leather-hard has worked best for me on delicate pieces.
Great question — in humid climates I let pieces sit until they’re firm but still a little flexible (usually 24–48 hrs, but check by touch). For small earrings, trim when leather-hard but not bone-dry. For jump rings: if your hardware can withstand bisque temps, you can insert it; otherwise attach after final firing. We usually recommend bisque-only additions for metal that can’t take high heat.
Paranoid = me. 😂 I echo the fan + plastic trick. Also try a microfibre cloth under the piece for even drying.
Okay I’m trying this tonight — nerves tbh. Quick notes:
– Printed the checklist from Step 2 and taped it near my table
– Forgot to make a ledge for drying so I’m improvising with foam blocks
– If anything goes wrong I’ll report back 😂
also, tiny typo in Step 1: ‘sclae’ instead of ‘scale’ — harmless but thought you’d want to know.
Wish me luck!
Quick newbie question: what’s the best clay body for lightweight earrings that still holds detail? I don’t want anything too heavy but want crisp textures.
Agree with admin — porcelain gives great detail but can be finicky with warping. Paper clay is more forgiving for thin jewelry forms.
Porcelain and some light-body earthenware clays are great for crisp detail and are fairly lightweight. Paper clay can also be lighter and forgiving for thin pieces. Test a few to see how they handle and how they fire with your glazes.
Great guide. A few assembly Qs:
– When assembling final pieces, do you recommend epoxy or jump-ring crimping for attaching findings to glazed pieces?
– Any strong adhesives to avoid because they react with glazes over time?
– Also curious if anyone has tips for polishing edges after firing without removing surface texture.
Thanks for the tips, all. We’ll add an assembly toolkit suggestion list covering adhesives, sandpapers, and protective finishes in the appendix.
I use a tiny file to clean edges post-fire and then a 400–600 grit sponge to smooth — keeps texture while removing sharp bits.
If epoxying, roughen the connection point a bit with sandpaper to help adhesion. Also wipe with isopropyl alcohol before applying epoxy.
I’ve had luck with jewelry-grade UV resin for some flat-backed pieces — cures fast but be careful with heat exposure later.
For glazed pieces, high-quality two-part epoxy is common and durable for attaching findings. Avoid adhesives that aren’t rated for ceramics or that yellow over time. For polishing edges, use fine-grit sanding sponges or diamond pads gently — test on a spare first so you don’t remove texture.
Really appreciated the drying section — leather-hard tricks were concise and practical.
A longer tip from my end:
– For uniform thickness, use guides or rolling pin rings.
– If cracking shows up, check for uneven thickness or trapped air. Compress edges slightly when joining.
– For beads, consider bisque-firing on a thin metal rod to keep holes from clogging.
Hope this helps someone! 🙂
Remove after bisque if possible, or use kiln wash on the rod. If glazing on the rod, I use thin kiln-wash and rotate carefully so drips don’t pool.
Bead rod trick = genius. Do you remove them right after bisque or after glaze? Thinking about how to avoid glaze drips locking the rod in place.
That rolling ring idea saved my life when I tried making consistent studs. Highly recommend for beginners.
Fantastic tips, Hannah — especially the bisque-firing on a rod trick. We’ll add a bead-specific note to Step 4.