Discover the Art of Nerikomi Pottery
Nerikomi pottery is a captivating technique that transforms clay into stunning works of art. By layering different colored clays, potters can create beautiful patterns and textures, blurring the lines between functionality and artistry. Whether you’re sipping tea from a handmade cup or admiring a vibrant vase, each piece tells a unique story.
In this article, we will explore five beautiful Nerikomi techniques that are perfect for all skill levels. We’ll start with Layered Patterns, where colors intertwine, creating mesmerizing designs. Then, we’ll dive into the world of Marbled Clay Effects, showcasing how to blend clays for a rich, organic look.
Next, discover Inlay and Relief Designs that add depth and character to your creations. Finally, we’ll wrap up with Sgraffito and Nerikomi Fusion, an exciting way to combine carving with color. Get ready to unleash your creativity and dive into the enchanting world of Nerikomi!

Understanding Nerikomi: The Basics
Nerikomi pottery is an ancient Japanese technique that intricately combines different colored clays to create patterned ceramics. This method can be traced back to the 17th century, originating from the idea of layering and molding clay to form a cohesive work of art. The magic of Nerikomi lies in the way colors and textures interact, offering endless possibilities for creativity and design.
The Art of Layering Clay
At its core, Nerikomi emphasizes the significance of layering. Potters meticulously prepare various clay bodies, mixing in different pigments to achieve a spectrum of colors. By cutting, stacking, and recombining these layers, they create visually striking patterns that can be further manipulated through shaping and carving. Each layer serves as a canvas for artistry and expression, and the results are often breathtaking.
For anyone looking to embrace Nerikomi pottery, it is essential to choose the right materials. High-quality stoneware clay is preferred for its durability and versatility. Some potters enhance their work by incorporating porcelain for brighter colors or more delicate effects. Additionally, experimenting with different slips can add another level of depth to your pieces, allowing for a unique twist on traditional designs.
A Blend of Techniques
The enchanting quality of Nerikomi is not just in layering; it also includes techniques like marbling, inlay work, and carving. As potters experiment with these methods, they uncover new design possibilities and challenges that ignite their creative spirit. For example, marbling blends colors for an organic appearance, while inlay techniques allow for intricate details to emerge from layered patterns.
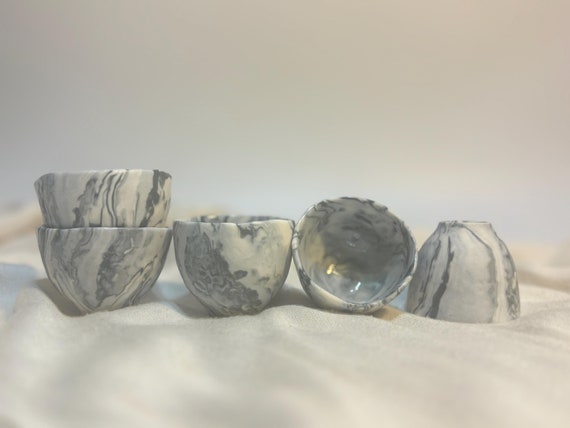
Those new to Nerikomi may find inspiration in everyday objects. Imagine drinking from a set of [Handmade Marble-Style Ceramic Tea Cups], where the colors swirl like a calm galaxy, each sip beaming with artistry. These functional pieces combine the beauty of Nerikomi with practicality, showcasing how art can fit seamlessly into our daily lives.
As you begin to explore Nerikomi, think about how the layering of clay can be translated into the stunning merges of color and pattern. Each piece invites you to delve deeper into a realm where tradition meets modern creativity. In the next section, we will elaborate on the first technique, Layered Patterns, proving how simple concepts can lead to extraordinary results.
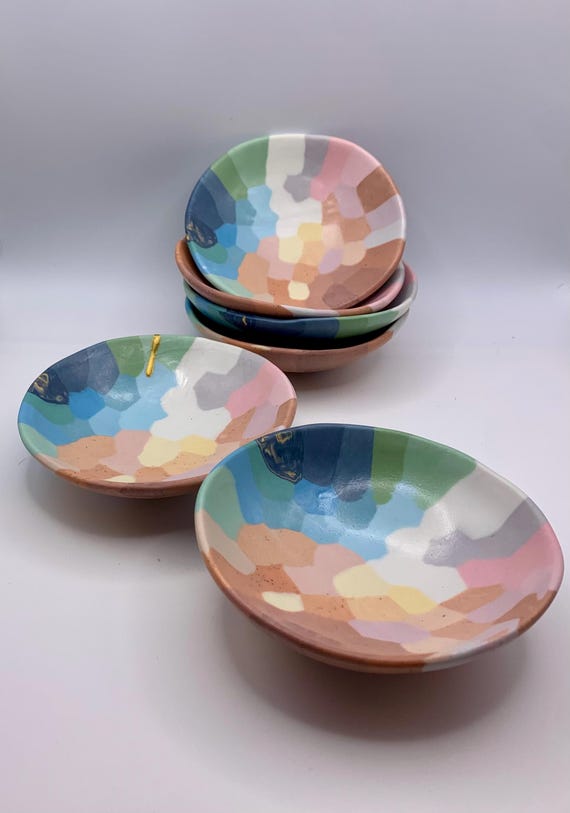
Technique 1: Layered Patterns
In the world of Nerikomi pottery, Layered Patterns are a delightful entry point into this intricate art form. By stacking different colored clays, you can create mesmerizing geometric or floral designs that bring your pottery to life. This technique is not only visually stunning but also remarkably satisfying to execute. Let’s dive into the process!
Preparing Your Clays
The first step involves selecting your clay colors. Consider picking at least three different clays, ensuring they complement each other. You’ll also need to prepare these clays by mixing them with pigments or natural stains to get vibrant hues. Make sure your clays are of similar plasticity to achieve consistent results.
Once your colors are ready, roll each clay into slabs of equal thickness. A consistent thickness, typically around ¼ inch, is key to ensuring even layering.
Stacking the Slabs
Now comes the fun part! Lay the slabs on top of each other, alternating colors. You can create blocks of each color or an intricate design based on your vision. For floral patterns, consider layering a light color beneath a darker hue to create depth. Once layered, gently pat the top to ensure the layers adhere, avoiding any air bubbles that can disrupt your final design.
Cutting and Shaping
With your stacked layers firmly pressed together, it’s time to cut. Use a sharp blade or pottery wire to slice through the slabs vertically, horizontally, or diagonally, depending on the pattern you desire. This step is where the magic happens! The cut edges will reveal the intricate coloration of your design.
Once you have your slices, they can be shaped into bowls, plates, or mugs. As you shape the clay, remember to manipulate the layers carefully to keep the pattern intact.
Final Touches
After shaping, you can further enhance your piece by adding texture through carving or using a stamping tool. This adds another layer of visual intrigue to your work. Allow the piece to dry to leather-hard before bisque firing it, and remember to glaze after the first firing to bring out the colors of your layers.
Inspiring Outcomes
Whether you’re opting for simple geometric designs or complex floral patterns, Layered Patterns in Nerikomi pottery can transform any lump of clay into a unique piece of art. Enjoy the process of experimentation, and don’t shy away from combining colors in unexpected ways. The possibilities are endless!
With an understanding of layered patterns under your belt, the next technique will surely captivate you: Marbled Clay Effects. We’ll explore how blending clays can yield beautifully organic results, expanding your creative repertoire even further!
Technique 2: Marbled Clay Effects
Marbled clay effects are a wonderful way to inject fluidity and motion into your Nerikomi pottery. This technique involves mixing different colored clays to create captivating swirls and blends that emulate natural elements such as waves, marbling, or clouds. Achieving the perfect marble effect can elevate your pottery from simple to stunning!
Preparing Your Clay Mix
To begin, select two or more clay colors that harmonize well with each other. The key to successful marbling is to ensure that the clays have similar moisture content and plasticity. Here’s how to prepare:
This approach can be likened to making a marble cake—just as you wouldn’t fully blend the batters, aim to leave distinct patches of color within your clay mix.
Creating the Marble Effect
With your marbled clay prepared, it’s time to shape your piece:
- Roll into a Slab: Once you’ve achieved the desired marbled look, roll the mixture into a slab. The thickness should be consistent across the surface, typically around ¼ inch.
- Control the Pattern: For more defined swirls, roll the origami-style clay slab in different directions or fold it over itself before rolling. This adds an extra layer of complexity to the final design.
- Cut and Shape: You can cut the slab into various shapes or forms. As you shape your piece (whether a bowl, plate, or mug), be mindful of how the colors will appear along the edges. This is crucial, as the marbling should reveal itself in all its glory once the piece is completed.
Maintaining Consistency in Texture
A common challenge with marbled effects is ensuring that the texture remains consistent throughout. Here are some tips to keep in mind:
Inspiration for Your Creations
The beauty of marbled clay effects lies in their organic nature; no two pieces will ever be exactly alike, each telling its own unique story. Consider how nature can inspire your designs. Imagine swirling ocean waves or the patterns of leaves in autumn. This resonance with the natural world can guide your color choices and marbling techniques.
Having explored the fascinating world of marbled clay effects, you’re now equipped with a new facet of Nerikomi artistry. Up next, we will delve into Inlay and Relief Designs, where you’ll discover how to add depth and distinctive features to your pottery pieces. Get ready to take your skills to the next level!
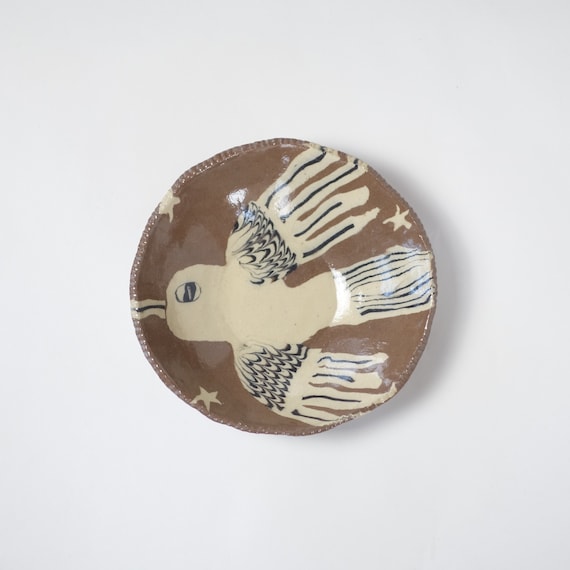
Technique 3: Inlay and Relief Designs
Inlay and relief designs take Nerikomi pottery to a whole new level of intricacy and creativity. By carving, inserting, and experimenting with colored clays, potters can create remarkable surface details that transform simple vessels into true art pieces. This technique not only enhances the aesthetics of your work but also adds a tactile dimension that invites exploration.
The Basics of Inlay
Inlay involves carving out sections of your clay piece and filling them with contrasting colored clay. Start by creating your base piece with layered or marbled clays, allowing it to firm up slightly before you start carving. Here’s how to get started:
Design Your Pattern: Sketch out a design on paper or directly onto your leather-hard base piece. Popular motifs include flowers, geometric shapes, or abstract swirls.
Carve the Base: Use a carving tool to gently carve away sections of your base, ensuring you create enough depth for the inlay without compromising the integrity of the piece. Aim for a depth of about 1/4 inch, and feel free to play with varying depths for a more dynamic look.
Prepare the Inlay Clay: Choose a vibrant colored clay that will contrast beautifully against your base clay. Roll this clay into small sheets and cut it into shapes that fit your carved areas.
Filling the Carved Spaces
Once your base is carved and your inlay pieces are ready, it’s time to press the inlay clay into the designated spaces:
Exploring Relief Designs
Relief design takes inlay one step further by incorporating raised elements instead of simply carving out spaces. You can create stunning 3D effects by layering different colors or textures. Here’s how to employ this technique:
Layering for Relief: Begin by rolling out slabs of your colored clays. Cut out shapes that you’ll stack onto your base piece. This technique works well for creating floral petals, leaves, or abstract shapes.
Adhesion and Texture: When attaching raised pieces, use slip (wet clay) to ensure a strong bond. You can also add texture by impressing tools into the surface or creating patterning with your fingers.
Finishing Touches: Consider adding additional carving or texture to both the base and relief components to enhance depth and visual interest. The more layers and textures you incorporate, the more captivating your piece will become.
Final Reflections
Inlay and relief designs open up a world of possibilities that allow you to imprint your unique style on each piece. Imagine creating a vibrant vase adorned with blooming flowers or a serving bowl with playful geometric designs peeking through the surface.
As you experiment with different colors and techniques, don’t be afraid to explore your creativity. Every potter’s journey is filled with learning moments, and each new piece presents an opportunity for growth and expression.
Building on this exploration of inlay and relief, we will next dive into Sgraffito and Nerikomi Fusion, where you’ll learn how to blend traditional techniques with modern flair to create truly unique designs. Get ready to see your pottery in a whole new light!
Technique 4: Sgraffito and Nerikomi Fusion
Sgraffito is a captivating technique that takes your Nerikomi pottery to the next level by introducing intricate designs through carving. This method involves layering colored clays and then meticulously carving into the surface to reveal the colors beneath, adding depth and texture to your work. Combining sgraffito with Nerikomi’s rich color layering opens up a world of creativity and design possibilities.
The Basics of Sgraffito
To begin experimenting with sgraffito in your Nerikomi pottery, you’ll first need to prepare your layered clay. Here’s a step-by-step guide to integrating the two techniques:
Choose Your Colors: Similar to previous techniques, select at least two contrasting colors of clay. Make sure they harmonize well together; for example, a vibrant red layered with creamy white can give a striking effect once the surface is carved.
Layering the Clays: Roll out your chosen clays into slabs and layer them. The key is to maintain a visually dynamic stack, as the top layer will be removed during the carving process, revealing the colors beneath.
Allowing for Optional Drying: After assembling your layered slab, let it dry to a leather-hard state. This ensures that it retains shape while making it easier to carve cleanly without distorting the piece.
Carving Your Design
Once your clay is firmly set, it’s time to introduce your design through carving:
Sketch Your Motif: Start by lightly sketching your desired design onto the surface of the piece. Floral patterns, geometric shapes, or even abstract swirls work beautifully.
Carving Techniques: Use a range of carving tools to create your design. Tools like loops or blades can help you achieve different depths and textures. Remember that the more intricate your patterns, the more visual interest they will add.
Control Your Depth: Be mindful of the depth of your carvings—aim for a clear contrast between the top layer and the underlying colors. A varied depth can also enhance the overall textural experience.
Achieving a Beautiful Finish
As you move through the carving process, here are some tips to ensure a polished outcome:
Inspiration for Your Fusion Creations
Imagine creating a vase with delicate leaves swirling around its exterior, each leaf defined by a thin carve that contrasts beautifully with a vibrant background. Or consider a serving dish that showcases an intricate mandala, inviting guests to admire its details while also serving delicious treats.
The fusion of sgraffito and Nerikomi techniques opens endless creative avenues, making every piece a unique expression of your artistic voice.
With the knowledge of how to gracefully blend sgraffito with Nerikomi pottery styles under your belt, the expansive world of creativity awaits you. Our next section will guide you on an exciting journey of self-discovery, as we encourage you to Embrace Your Creativity with Nerikomi!
Embrace Your Creativity with Nerikomi
As we’ve explored these five beautiful Nerikomi pottery techniques, we hope you feel inspired to experiment and create your unique pieces. Nerikomi is not just a technique, but a vibrant means of self-expression that allows for endless creativity in pottery. Each method offers countless possibilities, enabling you to develop your style while cherishing the art form’s rich heritage.
So, gather your tools, mix those colors, and let your imagination run wild! Whether you’re layering patterns or experimenting with inlay designs, embrace the joyful process of creation. Remember, every piece you make is a reflection of your artistic journey. Happy crafting!


Wow, I had no idea Nerikomi was so intricate! 😍 The layered patterns are stunning! I can’t wait to try making my own dishes. The pastel colored dots dish set looks adorable too! ❤️ Any tips for a beginner?
I think maybe some mint and soft pink would be cute! What do you think?
Thanks for your enthusiasm, Emily! Start simple with the layered patterns, and don’t worry about perfection. Just enjoy the process!
I agree! I love the pastel dots too. ❤️ Have you tried any specific colors in mind?
I love the idea of inlay and relief designs! They remind me of my grandma’s pottery. Anyone tried this method before? How does it compare to the layered patterns?
Both techniques have their beauty! Inlays can be more complex but are so rewarding.
I find inlay designs much more challenging! But they can create such beautiful depth in your pieces!
Thanks for the feedback! I’ll have to try both and see which one I vibe with more!
The sgraffito and nerikomi fusion caught my eye! I’ve never seen that before. 🤯 How do you even start with that? Any resources or tutorials you’d recommend?
Great question, Megan! There are some excellent video tutorials on YouTube that break it down step by step.
Yeah, I watched a couple! They helped a ton. Also, I read a book on pottery techniques that had some cool insights.
I love the idea of embracing creativity! Sometimes I feel like I should stick to one technique, but I want to try them all now! The pastel colored dish set would be a nice start, right?
Absolutely! Starting with something fun and simple is key. Just go for it!
Definitely! I think the best way to learn is by experimenting with different methods.
Not sure if I’m ready to dive into nerikomi yet, but those marble-style tea cups might be a perfect gift for my pottery-loving friend! 🎁 Any thoughts on the quality?
They’re really well-made! Perfect for gifts or as a treat for yourself.
I have a set, and they’re gorgeous! The quality is top-notch; you won’t regret it.
I’ve been into pottery for a while, but I never tried Nerikomi. The marbled clay effects look pretty cool though. Are they hard to master? 🤔 I might consider getting those marble-style tea cups to get inspired!
Marbling can be tricky but super fun! Just practice a lot, and you’ll get the hang of it.
Honestly, it took me a few tries to get it right. But the results are worth it! You should definitely give it a go!
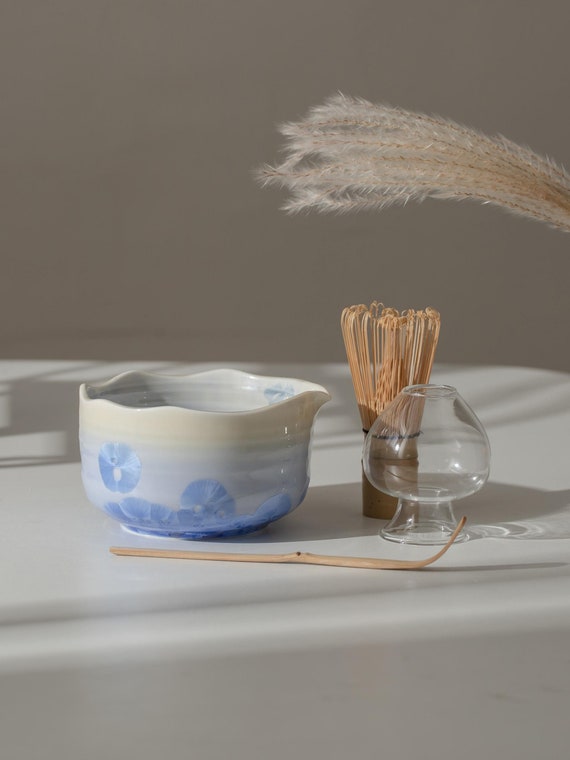
I’m a bit skeptical about the whole nerikomi thing. Can it really create something that looks as good as the store-bought pottery? 🤨 I mean, those handcrafted blue flower matcha bowls look amazing, but does it take years to get there?
I started out with zero skills, and now I make pieces I’m proud of! Just takes time and patience.
It definitely takes practice, Laura. But many people are surprised by their own results! You might surprise yourself.
I’m totally inspired to try Nerikomi now! 🎨 How do you guys feel about combining different techniques like sgraffito with marbling? That could be a fun mash-up!
Combining techniques can create unique pieces! Go for it and see what happens!
I’ve seen some amazing results from mash-ups! Just be creative and don’t hold back!
Looking at those colorful handmade porcelain tea cups! 😍 Do they really come in different sizes? I want something bigger for my coffee! ☕️
Yes, they usually come in various sizes! Just check the product description before you buy.